Since I was all done with Holiday decorating of my house as well as some parts of the outdoors, I thought that my office deserves some holiday decorating too. I was determined to bring some holiday cheer into this space where I spent most of the time during the weekdays.
This space is quite small and I didn’t want to apply a lot of decor in there. What I actually wanted, it was to create a statement decorative piece that will speak Holiday; a piece which will bring cheer and festive spirit into this space, and I did not want it to be a Christmas tree of any kind!
So the challenge was to decide what that statement piece would be!
After some “creative thinking” done over the weekend, I took one of the garlands from my house and brought it into the office. I wasn’t sure where I would place the garland at first! However, it did not take me too long to decide where to put it. Taking a glance at my huge round mirror on the wall, I decided that there is where this garland is going to be hung.
So there it is! It looks grand and fabulous, and I am loving it!
Enjoy some pics as much as I am enjoying the view!
Gjithehere i jam gezuar fundit te vitit, dhe ate pikerisht per faktin se kjo periudhe gjithehere nderlidhet me ngjyra te bukura, shkelqim, vezullim, hare e gezim si dhe me shpirtin e posaqem festiv qe sjellin festat e fundvitit.
Tani i gezohem edhe me teper ketyre festave pasi qe tash, me dizajnet e mija dekoruese kontribuoj drejteperdrejte ne krijimin e shpirtit festiv. Nga t’ja fillojme me dekorin festiv te interierit.
Ne prag te festave te fundvitit te gjithe tentojme qe te sjellim nje atmosfere me te hareshme ne ambientin ku jetojme. Megjitahte, jo gjithehere eshte i lehte realizimi i detajeve festive, pavaresishte se sot ekzistojne mundesi nga me te ndryshmet.
Kur vie fjala tek dekori festiv i ambienteve tona per festat e fundvitit, fillimisht propozoi qe te fillohet me percaktimin e paletes se ngjyrave te cilat do t’i perdorim ne dekorin e interierit.
Gjate viteve ne grumbullojme dekore prej me te ndryshmeve andaj nuke eshte e thene qe ti perdorim te gjitha qe i kemi, e sidomos mos t’i perdorim ato te cilat nuk i pershtaten paletes se ngjyrave per te cilen jemi percaktuar.
Nese e regullojme bredhin/pishen atehere te percaktohemi se ku do ta vendosim ate dhe t’a stolisim ate me ornamente qe i pershtatet paletes se ngjyrave per te cilen jemi percaktuar.
Nese kemi oxhak/kamin athere e dekorojme edhe ate, dhe aty mund t’i vendosim qorapet festive ku i vejme dhuratat qe ja bejme njeri tjetrit per keto festa.
Nje dekor te lehte e applikojme edhe ne koridor ne menyre qe ta ndjejme atmosferen festive qe nga momenti kur e hapim deren e shtepise.
Nese kemi shkalle ne koridor, nje pjese e rethojes se shkallve (gilinderave) munde t’a stolisim me xherdan te punuar nga deget e fresketa te pishes ose dege artificiale. Kjo e ben qe hyrja e shtepise te mer nje pamje mikpritese dhe tejet festive.
Gjithashtu e bejme dekorimin e kthines se trapezaris, pra aty ku behet sherbimi formal i ushqimit per familje dhe mysafiret.
Poqese kemi kuzhine te madhe, ateher edhe ndonje element i kuzhines dekorohet me ndonje kurore, xherdan ose ndonje aranzhim nga deget e pishes. Ngjyrat tjera përvec atyre simbol të festave, e kuqja dhe jeshilja, që mund të përdorim si elemente të dekorit të enterierit
E kuqja dhe jeshilja jane ngjyrat qe me dekada jane perdore ne dekorin e festave te fundvitit dhe tashme konsiderohen si ngjyrera tradicionale te dekorit festiv.
Megjithate, trendet ne vitet e fundit kan ndryshuar dhe tani kemi nje liri te perdorimit te ngjyrerave te ndryshme ne dekorin festiv dhe se cfare ngjyre do te perdorim varet nga ajo se ku gjejme inspirim dhe sa kreative jemi per sa i perket krijimit te nje palete te ngjyrerave qe do te duket bukur.
Per shembull ngjyra a bardhe dhe e zeze ne kombinim me ngjyrat metalike si ari, argjendi dhe bakri perbejne nje palete te shume te bukur qe munde te perdoret ne dekorin festiv dhe qe eshte shume ne trend keto dy vitet e fundit.
Megjithate, edhe ngjyrat tjera si nuance shume e bute roze ose roze tejet e ndezur jane ngjyra qe poashtu duken bukur ne dekorin festiv.
Pastaj per te kriju nje dekor rustik (rustic-anglisht)perdorim ngjyrat e dheut si ajo bezh etj, pastaj perdorim dekore/ornamente nga litari, linoja si dhe shirita dekorativ nga materiali thes, letra e vjetruar etj.
Disa nga detajet apo objektet, që nuk duhet t’i mungojnë interierit në këtë fundvit
Nje interier i bukur festiv patjeter se duhet ta kete nje pishe te dekoruar dhe ndriquar mire (200 drita te vogla LED ne cdo 50 cm lartesi perqark bredhit), sado e vogel qe te jet ajo.
Por kete fundvit, poqese kemi mundesi t’a punojme ose ta blejme, patjeter se duhet te kemi ndonje punim dekorativ nga deget e fresketa te pishes, si kurore apo xherdan (garland- anglisht) pasi qe aroma e tyre ne menyr instante e ngjalle ndjenjen festive dhe duken shume bukur ne cdo ambient.
Trendi i perdororimit te kurorave dhe xherdanve te punuara nga deget e fresketa te llojeve te ndryshme te pishave sa vjen e shtohet prej vitit ne vit, andaje te gjithe ata te cilet i percjellin dhe jane ne hap me trendet e interierit festiv deshirojne t’a ken nje detaj te tille kete fundvit.
Disa nga rregullat që duhet te ndjeken gjatë procesit te dekorimit
Rregulla e pare eshte qe per cdo projekt dekorues te krijohet nje KONCEPT permes te cilit percaktohet se si do te duket dekori i hapsires ne teresi dhe cilat pjese te asaje hapsire do te dekorohen, dhe ne cfare mase.
Pastaj, vendoset per paleten e ngjyrerave qe do te perdoren ne dekor, e qe njeherit eshte pjesa me e rendesishme e procesit pasi qe kjo mund te percaktoj edhe impaktin qendror vizuel.
Dhe ne fund e behet perzgjedhja e ornamenteve /dekorimeve qe do te perdoren ne dekor, e qe duhen te pershtaten me paleten e parapercaktuar te ngjyrnave.
Këshilla reth dekorit te interierit per festat e fundvitit
Elementi kyq i nje dekori te bukur dhe te qelluar festiv eshte qe ti mbajme nen kontrolle perdorimin e ngjyrave dhe ornamenteve qe do ti aplikojme ne dekorin festiv, se perndryshe do te perfundojme me nje dekor kaotik. Fillimisht,duhet t’a ngushtojm spektrin e ngjyrave qe do ti perdorim ne dekor duke i kufiziar ato ne tre gjer ne kater nuanca maksimum pasi qe do t’a kemi me lehte te bejme dekorimin dhe keshtu rezultati perfundimtardo te jet nje dekor perfekt dhe me shume shije. Pastaj mos te blejme dekorime ne menyre impulsive , vetem se na duken te bukura dhe na pelqejne aty per aty, pa u siguru se si do te inkorporohen ato ne dekorin tone, si dhe pa e ditur se ku saktesisht do t’a vendosim ate dekorim/ornament. Pra, nje dekor i bukur dhe mbreselenes eshte ai dekor i cili eshte i menduar dhe planifikuar mire, andaj poqese i permbahemi ketyre regullave te thjeshta padyshim se secili do te arij te krijoj nje ambient te bukur festiv.
Urime Festat e Fundvitit!
Segmenti ne Miremengjesi Kosove ne RTK Live ku flas rreth kesaje teme ku njekohesisht e bejme edhe dekorimin e bredhit ne studio.
Ju faleminderit qe vizituat kete faqe!
Besa
Ky postim permban te drejta autoriale! Kopjimi dhe distribuimi i textit dhe fotove pa pelqimin paraprak te autorit eshte i ndaluar!
As soon as one gets into the Holiday spirit than it is easy to get carried away with decorations; however, it is so fun and joy putting up all those twinkle lights, wreaths and garlands around the house or working spaces, so personally I think that there is nothing wrong with being carried away, and in some cases even overdoing it! If this is something that brings you joy and makes you happy, just go for it!
In my case I did not get carried a way too much, just a little!!!!! Or maybe a less than a way to much, and more than a little? Or certainly, just the way to much! No, I don’t think so! I Certainly did not get carried away way to much, but I was just in a mood to decorate for the Holidays and bring festive atmosphere around my Studio space to celebrate the launch of my Home Accessories line.
My Home Accessories line branded as besagmhomeaccessories was launched this month, and I started with a collection of unique pillow casings which will be selling online. Each pillow is carefully designed by me and prototypes also are handcrafted by myself, taking care that each detail thought on the design is carefully implemented in each pillow during the production.
I kindly invite all the visitors of this page, who like fun and elegant pillows to check my Instagram account of my newly launched brand @besagmhomeaccessories and leave a comment expresing their opinion about those designs.
Now I leave you with some pics of my Studio hallway space all decked up for the Holidays where I scattered around some pillows from @besagmhomeaccessories line.
Next time I will share some pics of my Office holiday decor.
If you did not get into the Holiday spirit yet, than you should! The most wonderful time of the year has come, and we should start enjoying it as long as possible. So, if you haven’t done anything yet to your home to mark the start of the Holiday season, than starting this coming week is about the right time.
I know, in this busy world we are living in, it is so hard to find time to decorate for the Holidays, and moreover to deal afterwards with the hassle of putting away decorations when the Holidays are over. However, the joy and happiness that we experience during this time of year, especially if we are surrounded with a bit of holiday sparkle, is all worth it.
Yesterday was the day that I started getting into the real Holiday spirit. I made a fresh fir garland for my mantel and it turned gorgeous, and the fresh mountain smell has got into the all corners of the room. I love decorating with fresh greenery. Using fresh greenery for holiday decoration increases the holiday spirit and adds natural beauty to any home.
As usualy, this year as well I kept my mantel decor simple and fresh. On the chair I displayed the coral red pillows from my @besagmhomeaccessories line and I am happy to share with you some of the pics I took after I was done with the decor.
Have you started decorating for the Holidays yet? When do you consider the right time to start decorating for the Holidays? Is it beginning of December too early? Share your view!
Thank you for visiting this blog.
Deshira e secilit prej nesh eshte qe te ket ne dispozicion sa me shume metra katrore ne banese apo shtepi sepse siq eshte ajo thenja popullore “sa me shlire aq me mire”, por shumica, e posaqerisht ne qytetet e medha, jetojne ne banesa me dhoma te vogla qe vertet eshte sfide per t’i arreduar.
Megjithate, mungesa e hapsires banuese nuk do te thot se kjo duhet te jet shkas qe banesa ose shepia jone te mos jet funkcionale ose te mos ket stil.
Edhe hapsirat me te vogla banuese mund te shendrohen ne ambiente te bukura e funkcionale nese i implementojme disa truqe te vogla qe e bejne hapsiren te duket me a madhe.
Pra ka menyra te ndryshme se si mund t’i shfrytezoni metrat katror te cilat i keni ne dispozicion ne menyre qe ta transformoni hapsiren tuaj te vogel ne nje hapsire te bukur e funkcionale te cilen e meritoni.
Nese e keni nje banese garsonjere per shembull nuk do te thot se mungesa e hapsires se bollshme te ju beje te ndiheni se jetoni ne nje dhome konvikti.
Pra, cila eshte zgjidhja? Hapi i pare eshte te shiqojme se cfare kemi ne ate dhome te vogel dhe se si i kemi aranzhuar mobiljet. Ndoshta vet menyra si i kemi aranzhuar mobiljet eshte ai problemi qe e bene dhomen e vogel, te ngulfatur dhe jofunkcionale. Per t’a areduar nje hapsire te vogel si garsonjera psh. eshte mire qe ajo hapsire te ndahet ne zona te ndryshme te shfrytezimit ne menyre qe t’a bejme multifunkcionale. Nese e kemi shtratin ne ate hapsire ta bejme qe dhoma mos te duket vetem si dhome fjetjeje. Pjesen tek shtrati e ndajme me ndonje gjysem muri, me ndonje raft librash ose paravan dekorues, dhe ne pjesen tjeter i vendosim mobiljet tjera si kolltuku, kanape e vogel, tavolinen etj.
Perveq garsonjerave qe vertete kan shume pak hapsire banuese shpeshhere edhe banesat me me shume dhoma kan dhoma me siperfaqe te vogla, por fatmirsisht egzistojne disa zgjidhje te lehta qe ndihmojne qe t’i bejme qe keto hapsira te duket me re medha, me mikepritese dhe me me stil.
Ja edhe disa prej truqeve qe e bejne nje hapsire te vogel te duket me e madhe:
Ti kushtojme rendesi ndriqimit. Secila hapsire do te duket me e madhe poqese eshte e ndriquar mire qoft me ndriqim natyral ose artificial i cili medoemos duhet te jet i balancuar qe do te thot te vendosim ndriqim artificial aty ku zhvillohet ndonje aktivitet si ne trepezari, kendin e leximit, ne tavan etj. Ti menjanojme perdet e trasha dhe t’a lem driten natyrore te depertoj brenda. Te shtojme me shume llampa qofte ne mure, ne dysheme ose siper orendive ne ato vende ku ka nevoje dhe ku zhvillohet ndonje aktivitiet.
Perdet duhet te ken ngjyre te njejt sikurse ngjyra e mureve. Perdet qe kan ngjyre te njejt sikurse muret e bejne qe dhoma te duket me e madhe, e posaqerishte nese vendosim perde transparente, perde te holla qe mundesojne depertimin e drites. Poashtu, kur jemi tek perdet, ato duhet te vendosen jo menjiher siper dritares por ato duhet vendosur sa me afer tavanit, kjo e bene qe muret te duken me te larta, e me kete edhe hapsira do te duket me e madhe.
Te perdorim orendi qe jane te tejdukshme. Duke perdorur orendi nga materialet e tejdukshme gjesendet qe jane te vendosura prapa tyre do te duken shume me large dhe ne kete menyre krijohet ajo ndjena e hapsires. Orendit nga materialet e tejdukshme munde te jen tavolina e kafes ose e ushqimit, karrigat, tavolina anesore etj.
T’e perzgjedhim kolltuqe dhe sofa te cilat kane kembe. Kjo bene qe perfundi tyre te depertoi drita dhe te krijoi keshtu nje ndjenje te hapsires.
Te perzgjedhet nje palet te ngjyrave neutrale dhe te qelta. Kjo e bene qe, vizuelisht, hapsira te duket me e hapur dhe me e madhe. Por nese na pelqejne ngjyrat me te theksuara mund ti perdorim edhe ato, por me rendesi eshte t’a bejme implementimin e drejte te tyre si psh. te perdorim nuanca te te ndryshme te te njentes ngjyre, qe do te thot te perdorim palet monokromatike te ngjyrave.
Te kordinohen ngjyrat e mureve dhe mobiljeve. Kontrasti i ngjyrave e ben ndarjen e hapsires dhe e ben qe dhoma te duket me e vogel. Orendit jane me pake te dukshme dhe pershtaten me mire ne hapsire nese jan te ngjyres se njejt ose te ngjashme me orendit tjera ne dhome.
Te perzgjedhjen materiale te mobiljeve qe jane nje ngjyreshe ose kan te printuara detaje te vogla ne to.
Te perdorim pasqyra! Reflektimi ne pasqyre e ben qe hapsira te duket me e madhe. Sidomos preferohet te vendoset pasqyra perballe dritares ne menyre qe te reflektohet drita natyrore si dhe pamja nga jasht brenda.
Egziston nje rregull i vjeter qe thot se mobiljet e vogla ne hapsira te vogla jane gjeja e duhur, por nje ose disa gjesende te medha arreduese ne nje dhome te vogel shpeshere munde t’a beje qe nje dhome e vogel te duket me e madhe.
Te perdorim akcesor dekorativ te medhenje. Besoni apo jo por perdorimi i nje akcesori dekorativ te madh ne vend te disa te vegjelve ka efekt me te mire ne siperfaqe te vogla dh vizuelisht e ben qe hapsira te duket me e madhe. Mungesa e akcesorve dekorativ qofshin ato korniza ne mur ose akcdsor tjere nuk e bejne dhomen te duket me e vogel por e bejn te duket e zbrazet, pra edhe ne hapsira te vogla duhet medoemos te perdorim akcesor dekorativ.
Me rastin e vendosjes se mobiljeve ne dhome mos t’i mbeshtesim ato automatikisht per mure por te lem zbrazetire, sa na lejon mundesia, ne mes te murit dhe gjesendit mobilues. Nganjehere vendosja e tyre ne kend ose te rrethuara me hapsire pozitive e bene qe hapsira te duket me madhe.
Te perdorim mobilje multifunkcionale. Per shembull nje otoman me nje kapak ku munde te vendosim gjesende brenda munde te sherbej edhe si tavoline e sherbyese ne dhome edhe si vend per tu ulur kur kemi nevoje. Pastaj nje tavoline anesore perfundi se ciles mund te vendoset ndonje otoman i vogel apo nje trepezari me dimensione te vogla por me mundesi te hapjes jane zhghidhje te mira per nje hapsire te vogel.
Pra me ngjyra neutrale dhe me nje palete monokromatike te ngjyrave, me perdorimin e mobiljeve te duhura dhe me aranzhimin e drejte te tyre si dhe me perdorimin e ndriqimit natyror dhe atij artificial permes abazhureve interesante, hapsira e juaj e vogel nuk do te duket e ngulfatur. Te gjitha keto do t’a bejne qe hapsira e juaj e vogel te duket me funkcionale, me e hapur dhe me me stil.
Segmenti ne Miremengjesi Kosove RTK Live ku flas rreth kesaj teme
The fellow bloggers out there have already started to deck their halls for the Holidays, but not me; not yet for now.
I am not fan of an early Holiday decorating, so I haven’t started yet. However, I am very, very late with posting the pics of how I decorated my front porch last year. I was quite busy last year and I wanted to do a post on this, but I kept procrastinating until it was too late.
But hey, never is too late so I am happy that I found these photos while I was looking for something else and happy to share them with you.
The front door was decorated with a huge garland made of fresh fir branches. I made two of such garlands last year, one for the fireplace and the other for the front door and both were spectacular. I can still smell them.
I have no clue how I am going to decorate this year and when I am going to start decorating. Hopefully, I come up with something nice and hopefully I will start soon!
So here are some last year front porch pics. Enjoy!
Te kesh nje pune te cilen mund t’a ushtrosh nga shtepia eshte nje luks i vertete, mirepo me zhvillimin e teknologjise si dhe me ndryshimin e rethanave te jetes e punes shume shpejte eshte duke u rritur numri i profesioneve te cilat munde te ushtrohen nga shtepia, prandaje tani nje luks i tille i punes nga shtepia eshte plotesisht i mundshem.
Mirepo, problemi eshte se jo secili qe e ka luksin ta ket nje pune nga shtepia e ka edhe luksin qe t’a ket nje dhome te dedikuar enkas si dhome pune.
Megjithate me disa keshilla qe do t’i shpalosim ketu secili, qe e ka nje pune nga shtepia ose sjelle pune ne shtepi nga zyra ku punon, munde t’a krijoj nje vend super produktiv dhe te rehatshem te punes coft edhe ne nje hapsire shume te vogel.
Pra, edhe nese nuk e kemi ndonje dhome te zbrazet per te vendosur dhomen e punes, duhet te behemi kreativ dhe te gjejme hapsira perbrenda shtepise ose baneses qe t’a krijojme nje kthine pune.
Shpeshehere ne mungese te nje hapsire adekuate ku do ta vendosnim kendin e punes duhet t’i shfrytezojme hapsirat negative qe mund ti kemi, e poashtu te behemi inovativ me hapsirat qe normalisht nuk do t’i konsideronim per vendosjen e nje kendi te punes.
Ne munges te nje hapsires adekuate per dhome te punes, hapsirat alternative ku munde t’a vendosim nje kend e punes munde jen
Hapsira nen kulm
Bodrumi i shtepise
Ndonje pjese e koridorit
Hapsira nen shkalle
Dollapi ne mur
Ndonje kende ne dhome te qendrimit ditor, dhome te fjetjes ose kuzhine
Gjeja me e rendesishme me rastin e perzgjedhjes se nje kendi te tille eshte qe te sigurohemi se ka sadopak privatitet dhe eshte larg zhurmes se TVs, femijet ose bisedat e zhurmeshme te fqinjeve (ka edhe te atille). Eshte me rendesi qe anetaret e tjere te familjes te kuptojne se ai kend eshte zyra e juaj i punes sikurse edhe cdo zyre tjeter.
Perzgjedhni nje palet produktive te ngjyrave
Disa ngjyra jane me stimuluese se te tjerat. Ju munde te mendoni se ngjyrat neutrale, sic jane nuancat e gnjyres bezh, jane me produktive se te tjerat por ne te vertete keto nuanca munde te mos ju ndihmojne ne koncentrim ose te ju shtjerin energjine ende pa bere pune. Andaje, prefereohet te dekorohet hapsira e punes ose zyra me ngjyre, me tapeta, perde dhe dekor qe ju motivon dhe ju shtyne te punoni.
Ngjyra e verdhe (sarih) eshte njgyre optimistike, qe bie ne sy dhe qe e nxit kreativitetin andaj eshte e pershtatshme per shkrimtar, artist dhe disajner.
Ngjyra e kaltert eshte shume qetesuese por gjithashtu e motivon performancen. Ngjyra e bardhe eshte ngjyre neutrale stabile andaje munde te konsiderohet si ngjyre ne prapavije.
Nuanca e ndezur e se kuqes eshte e pershtatshme per personat qe jane me aktive gjate punes , kjo ingjyre shpejton te rahurat e zemres dhe evokon pasion.
Ngjyra e gjelber eshte e pershtatshme per ata qe punojne me nje orare me te gjate sepse kjo ngjyre evokon ndjenja qetesuese pa shkaketuar lodhje.
Perdorni mundesi te ndryshme te ndriqimit
Ndriqimi eshte mundesia me e mire per t’i bere qe hapsirat e vogla te duken me te medha. Nese egziston mundesia qe te vendoset zyra ose kendi i punes prane ndonje dritareje atehere kjo eshte shume mire sepse ndriqimi natyror eshte stimulues dhe e shton produktivitetin ne pune. Megjitate, shiqimi nga dritarja gjate punes munde te jet shperqendrues dhe te na pengoj gjate punes, andaj ketu vjen ne shprehje perdorimi i perdeve ose roletave te ndryshme qe t’i shmangemi ketyre e pengesave.
Ne mungese te drites natyrore perdorimi i ndriqimit artificial eshte imperativ, mirepo nese duhet te perdorim ndriqim artificial, me rastin e perzgjedhjes duhet te informohemi mire dhe te bejme perzgjedhjen e duhur. Dritat fluroshente, led psh. munde te jen shume te forta dhe te ju bejn te ndiheni sikurse ne ndonje zyre industriale, andaj poqat me drite natyrore jan me te preferuara. Llambat e tavolines, spot llambat si dhe ato te dyshemes jane ideale, e me perdorimin e kokave te llambave ne munde te nkorporojme edhe ngjyra stimuluese ne kendin e punes.
Shfrytezoni hapsirat vertikale
Dizajni eshte nje aspekt shume i rendesishem kur kemi te bejme me hapsira te vogla.
Ne menyre qe maksimalisht te shfrytezohet siperfaqja e metrit katror, preferohet te perqendrohemi te aranxhojme ne lartesi e jo ne siperfaqe. Vendosja e rafteve ne mure dhe nje tavoline te ngusht e cila eshte e perforcuar ne mur (floating) do te beje te mundshme shfrytezimin maksimal te siparfaqes. Pra t’i shmangemi perzgjedhjes se tavolinave dhe karrigave masive te cilat do t’a ngulfasin siperfaqen, e te fokusohemi ne karriga minimaliste por qe ofrojne komoditet. Gjithashtu edhe aksesoret ne keto kende duhet te jen te vogla duke filluar nga llambat, kompjuteri etj. Tani ne treg kemi tavolina prej me te ndryshmeve qofshin per nga madhesia, materiali e dizajni andaj padyshim se do ta gjejm nje qe i pershatet hapsires dhe stilit tone aredues.
Ja pra, kjo eshte e tera se cfare duhet te beni per te krijuar dhome pune ose nje kthine pune kudo ne shtepi apo banese.
Nese e krijoni nje dhome pune duke i perdorur ndonjeren nga keshillat tona, na shkruani dhe dergoni fotot se si doli dhoma juaj.
Nese nuk keni kohe te mereni me arredimin dhe kompletimin e nje kendi te tille ne shtepine ose banesen t’uaj na shkruani ne besagmblog@gmail.com dhe caktojeni nje termin qe te bisedoni me staffin profesional te BESA GM Interiors rreth ndihmes per arredimin e haspirave t’uaja.
Segmenti i RTK Miremengjesi Kosove ku diskutova rreth kesaj teme:
Hello everyone! I’m so glad that you found yourself here today for the reveal of my Home Decor/Styling Studio Office Space. It has been, if I may say, a very short six week period along with a lot of sweat and hard work involved to transform this room from a modern farm house style sitting room into a chic, modern and stylish office where I will meet my clients to discuss and plan the projects that I will be working on.
This room which is now being used as an office is part of a two bedroom flat which is the premise of my Home Decor and Styling business branded as BESA GM Interiors. The other areas in this flat are also being utilised for various tasks associated with this business. This new location of my business is more central than the previous one, and I am happy that I will be operating my business from this location.
Almost every furnishing item used in this design project was either DIY’ed or previously owned by me or others. The only new purchases which I made to complete this project were the round mirror, the light pendant, and a few yards of fabric for pillows. The pillows were also designed and made by me, and I love them how they turned out.
To cut down the costs, and to make this event even more challenging for me, I painted the walls and the window by myself, and the only thing I had to pay for was the costs for refinishing the floors. Moreover, I DIY’ed the stencil also, hence the costs went further down!
The wall art above the settee is the artwork from a local artist and these frames used to hung above my desk in my previous office space. I think that they look even better now above the small settee which is another slipcover DIY for this project. The settee used to be part of a small sectional and it is a hand me down piece which I fancied up with a black slipcover.
I used to have these two round black velvet chairs in my previous office space, and frankly I think that against this pretty stencilled wall they look gorgeous and way much better than in the previous space.
The DIY blush wool fabric pillows with a bias loose piping in navy look fabulous on these chairs as they added colour, texture and more comfort to the chairs.
I made these black and white geometric design pillows for another project but I will be using them in this space now. They added such a modern vibe to the room.
The leopard print pillows, as well as the orange one were made for this project and I think that they make this settee look much more comfortable and modern.
The art above the desk is another DIY. I especially love how the featured stencil wall in front of my desk looks, so I wanted that the artwork that I intended to hung on that wall be somewhat see through.
To achieve the intended “see through” look I created these two pieces of artwork using quality preowned brass frames on which I placed double sided glass, in between of which I inserted geometric shapes of golden wrap paper. The result? Just what I wanted, and I love how these frames are cheering up that corner without holding any actual artwork; however, these are a true artwork to me now!
The floor lamp is an old lamp and altered its look a bit for this project. In one of my future posts I will be sharing how I changed the look of the lamp for the use in this project.
An existing carpet, as I showed in my previous post, was cut into a cowhide shape which turned quite nice and I think it really ties nicely together everything in the room.
So this is all what I could do in six weeks on a super limited budget, and considering the circumstances I think that I did OK. I hope that this may inspire someone out there to challenge herself/himself to tackle a big project on a super tight budget.
I want to thank Linda from Call It Home blog for organising the ORC event twice a year where we may inspire and get inspired from the featured designers and so many talented guest participants taking part in this event.
Just a small recap about the ORC event:
The One Room Challenge is a 6 week room makeover challenge for designers and bloggers In North America, all started by Linda from Call It Home blog. There are 2 sides of this event. One side being the 20 selected designers competing for the win. On the other side, there are hundreds guest participants like myself. At the end of the 6 weeks, the editors of Better Homes and Gardens will select 2 guest participants to be FEATURED DESIGNERS in the 2019 Spring ORC challenge!
Now it is time for you to go and check the reveals from this event of the featured designers and guest participants. WARNING: you will WOW a lot!
As I am writing this post I am getting more nervous than ever, and I try to keep calm staring at my fall centrepiece on my coffee table that I recently DIY-ed and which I find to have such a calming effect on me. Even though I am almost done with all big tasks, such as painting, refinishing the floors, applying the stencil in feature walls, altering and installing the roller shades, altering the existing rug etc I am quite nervous about how my photos would turn out as the big day is approaching.
If you are new here, thanks so much for checking out my Studio Office Space Design On a Budget project. You can check my first , second post, third and fourth one related to this project if you’d like to see or get reminded what I started with when I entered the One Room Challenge event and the progress thereafter.
My custom made mirror arrived and I am happy how it turned out. I wanted a huge round shape mirror but I couldn’t find the size I was looking for; thus, I ordered a custom made one. It is now hanging on the wall and I am loving it.
I wanted a completely different light fixture than the one in the picture, but it was expensive and I could not afford so I opted for this one which I purchased the other day and it is waiting for install.
I also made some pillow covers and they turned pretty nice.
I had a rug which was unused for quite some time and since it was a good quality I somehow resisted to give it away. I wanted to give this rug another chance so I altered it a bit so I could use it for this project.
I cut the rug in a cowhide shape and finished the edges in black.
So everything is pretty much finished and now I need to do some styling and then the photoshoot which I find to be the most challenging part of all.
Just a small recap about the ORC event:
The One Room Challenge is a 6 week room makeover challenge for designers and bloggers In North America, all started by Linda from Call It Home blog. There are 2 sides of this event. One side being the 20 selected designers competing for the win. On the other side, there are hundreds guest participants like myself. At the end of the 6 weeks, the editors of Better Homes & Gardens will select 2 guest participants to be FEATURED DESIGNERS in the 2019 Spring ORC challenge! All featured designers and most of the guest participants work with various sponsors. I am not a lucky one to have a sponsor!
Halloween is here, and most of you have already decorated your homes, front porches or your backyards for this fun and spooky holiday. You may have carved your pumpkins too, and have stocked up your pantries with chocolate and candies for those happy trick-or-treat little friends that will show up on the Halloween night at your front porches.
I did all of the above except I did not carve any pumpkin as I proved to be terrible on doing that. Over the years I made several attempts to carve a funny or spooky pumpkin but I failed on each attempt.
This year I was quite late on putting up my Halloween decor. I kept procrastinating for days, until few days ago when I realised that there are only a few days left keeping us apart from this fun and spooky day.
Finally my Halloween Festive Dinner Table is now all set along with a spooky backdrop, and I am happy to share it with you.
Everything in this decor is DIY-ed except the faux spiders that were purchased few years back, meaning the shown decor had no cost at all.
Let’s start from the backdrop. To add a more dramatic effect to the whole scene, the golden frame mirror at the centre was altered by adding stripes of black contact paper.
The black wreath on the mirror was created using the willow branches from my garden, which was then spray painted in black. For the wreath decoration I made two small ghost figures using ping pong balls covered with small pieces of white cloth.
To add some texture, the tops of the two black tin vases were decorated with stripes of black fur. Creepy branches in these vases were created by tying black ribbon here and there, and by applying creepy white dots on the ribbon knots.
The whole area around the mirror is covered in bats of all sizes which were created by black peal and stick contact paper. The white paper peal was used also to create the special effect resembling a vampire bat.
The console table is decorated with squash pumpkins which I have stocked for winter soups. Between pumpkins I added some dried hydrangeas which come from my aunt Meli’s garden.
The plates on the table were spray painted in black, and they are being used as decoration only and to set the spooky mood! The dinner will be served on the plates underneath, but these DIY plates are adding a special spooky effect to the table.
The black glasses were decorated with a piece of golden wrap paper on top of which I glued f aaux spider.
On top of the white tablecloth I placed black and white striped runners on the both sides of the table, and this really added a stylish contrasting effect to the whole setting.
And lastly I added some pop of colour with two plum colour pillows on the chairs, and ended up with a bit spooky and yet quite elegant table setting which costed me only 0,99 cents to put it up. Considering the cost, I am very happy how it turned out.
If this post inspired you to decorate for halloween, or you used any of the decorating ideas above, please write and share with us. I would love to se how your decor turned out.
Thanks you for checking this blog!
Besa
Dekorimi i tryezes per darken e Hallouiinit
Hallouiini na erdhi, dhe shumica veqme i kan dekoruar shtepite, hapsirat para shtipive si dhe oborret e tyre per ket feste argetuese dhe paksa frikesuese. Ndoshta shumica gjithandej veqme i kan gedhendur kungujt e Hallouiinit si dhe i kan mbushur dollapat me sheqerka dhe cokollada per t’ju dhuruar femijeve qe do te vijne tek dera ne naten e Hallouiinit per lojen “truk apo sheqerke”.
Une i bera te gjitha te lartepermendurat perpos qe nuk e bera gedhendjen e kungullit pasi u deshmova te jem shume e pashkathet per t’a bere nje gje te tille. Pergjate viteve qe te gjitha perpjekjet per ta gedhend nje kungull me fytyre te frikshme deshtuan, andaj tashme kam hequr dore per nje pune te tille.
Kete vit mbeta shume vone per t’a bere dekorin e Hallouiinit. E shtyeja cdo dite kete punen e dekorit, deri sa para pak ditesh e pash se vetem edhe pak dite na ndajne nga kjo feste e cila poashtu me te madhe eshte duke u shenuar edhe ne Kosoven e pasluftes.
Andaje, tryeza ime festive e darkes se Hallouiinit tashme eshte shtruar dhe poashtu prapavija e tavolines eshte dekoruar me dekore frikesuese qe i perkasin kesaje feste, dhe me kenaqesi po e ndaj me ju kete dekor si dhe menyren se si eshte realizuar.
Elementet dekoruese ne keto pamje jane te bera vet (DIY) perpos te disa merimangave plastike te cilat jane blere per kete projekt dekorues,
Le te fillojme me prapavine e dekorit. Per t’a bere pamjen sa me dramatike pasqyra me kornize ari eshte modifikuar ne ate menyre ku siper saje jan vendosur shirita te prere nga letra e zeze vetengjitese.
Kurora e zeze ne pasqyre u krijua duke i perdore deget e shelgut nga kopshti im dhe te cilat dege, pasi u mblodhen ne forme rethore, u sperkaten me ngjyre te zeze spray dhe pastaje kjo u dekorua me dy fantazma te krijuara nga topthat e ping pongut te mveshur me nje copez te pelhures se bardhe.
Per te shtuar teksture, pjeset e siperme te vazove te zeza u dekoruan me shirita te peliqes se zeze, ndersa deget frikesuese ne keto vazo u krijuan duke i lidhur ne dege shirita te zi dhe duke ju vendosur pika te bardha per ti bere te duken si sy te ketyre krijesave te frikeshme.
E gjithe hapsira perreth pasqyres eshte mbuluar me lakuriq fantazma te te gjitha madhesive e te cilat u punuan nga letra e zeze vetengjitese. Se pari, ne anen e kundert u vizatuan lakuriqet dhe pastaj u prene me gersher dhe u ngjiten ne mure. Pjesa e poshtme e bardhe e letres vetengjitese poashtu u shfrytezua duke e vendose nen pjesen e zeze per te krijuar keshtu nje shtresim dhe teksture ne mure dhe per te krijuar keshtu edhe efektin e lakuriqit fantazme.
Tavolina mbeshtetese ne mure eshte dekoruar me kunguj te vegjel vidim te cilat i kam grumbulluar per dimer per supen e kungullit qe e pelqej shume. Perreth kungujve vendosa lule topi (hydrangea) te thara te cilat i mora ne kopshtin e halles sime Meli.
Pjatat me rrjet marimange i krijova duke perdorur pjata te vjetra te cilat i bera me spray ngjyre te zeze ne te cilen paraprakisht vendosa nje rrjete te vogel marimangeje dhe pasi ngjyra u tha e hoqa ate dhe pjata me motiv rrjete marimangeje u krijua sa qel e mbyll syte. Ushqimi do te servohet ne pjata tjera te vendosura per momentin nen pjatat marimange, ndersa keto siper do te sherbejne per t’i dhen tavolines ate efektin frikesues qe e kerkon kjo feste.
Gotat e zeza jane dekoruar me nje copez letre rrumbullake ngjyre ari siper se ciles eshte ngjitur nje marimange gjigante.
Siper mbuleses se bardhe te tavolines, nga te dy anet e saje, vendosa mbulesa te ngushta me vija bardh e zi, dhe vertete keto i shtuan tavolines nje kontrast me shume stil.
Dhe se fundi, shtova nje doze ngjyre me dy jastek ngjyre kumbulle te vendosura mbi karrige dhe shume lule te thara si dhe qirinje te zi, keshtu qe arrijta nje dekor paksa frikesues por para se gjithash elegant duke shpenzuar vetem 0.99 cent per merrimangat plastike. Duke e pase parasysh koston, jam shume e kenaqur se si doli ky realizim.
Nese ky postim ju ka inspiruar qe te dekoroni per Hallouiin, ose e keni shfrytezu ndonjeren nga idet dekoruese nga ky postim, na shkruani dhe ndani me ne pervojen t’uaj. Ne ne BESA GM Interiors do te donim te dijme se si doli dekori i juaj.
Week four is here, and I am happy to show you the progress I have made so far in the room during the last week.
If you are new here, thanks so much for checking out my Studio Office Space Design On a Budget project. You can check my first , second post and third one related to this project if you’d like to see or get reminded what I started with when I entered the One Room Challenge event and the progress thereafter.
There were a lot of DIYs that I tackled this week and, may I say, this week was much more labour intensive than the previous week.
First, I started with altering the store bought roller shades. I found grass cloth ones in black, just the right colour I was searching for and it was a pure luck to find them in stock at the store.
However, the shades were not the size I wanted, so I had to alter them to fit the size of the window. Beside altering the size of the shades, I also added a white stripe corner detail using the leftover fabric from the shades that I did for the windows of the work room.
Ideally, I wanted a one piece shade for this window, but I wasn’t such a lucky person to find the right size so I had to take what it was available in stock. I am happy with the end result as they fit perfectly in the window and have added a moody mode to the space.
After finishing the roller shade alteration, I started with the daunting stencilling job using a sharpie. The sharpies that I was using were not of a good quality as there were no good quality ones available for purchase.
I was so scared to start and do the first little square. It took me several attempts to start and I withdrew again, because I knew that if I mess this up, at the start, than it will get really, really messy and I have to redo the room again with the paint.
At one point I just had to take my chances and START! So I did, and it is not without a lot of challenges, and some cheating along the way, that I am keeping up with applying this stencil.
My DIY stencil is really sloppy, lacking the proper cut, precision and material, so it is very difficult to line it up and keep the straight line along the way. However, I have somehow managed how to deal with the way this pattern goes, so the whole thing does not get completely out of control. I hope that I will be able to complete this task without a major failure at the end. Wish me much luck guys!
The real challenge is to finish the corners. What I am doing is this; I cut a piece from the stencil which I, based on my estimation thought would work for finishing the corners, and I keep using it for the corners and at the top and the bottom of the wall. It is working pretty muchf OK so far.
If you do not want to go through the adventures I am going through with this stencil than you may purchase the proper one at this link.
Just a small recap about the ORC event:
The One Room Challenge is a 6 week room makeover challenge for designers and bloggers In North America, all started by Linda from Call It Home blog. There are 2 sides of this event. One side being the 20 selected designers competing for the win. On the other side, there are hundreds guest participants like myself. At the end of the 6 weeks, the editors of Better Homes & Gardens will select 2 guest participants to be FEATURED DESIGNERS in the 2019 Spring ORC challenge! All featured designers and most of the guest partcicipants work with various sponsors. I am not a lucky one to have a sponsor!
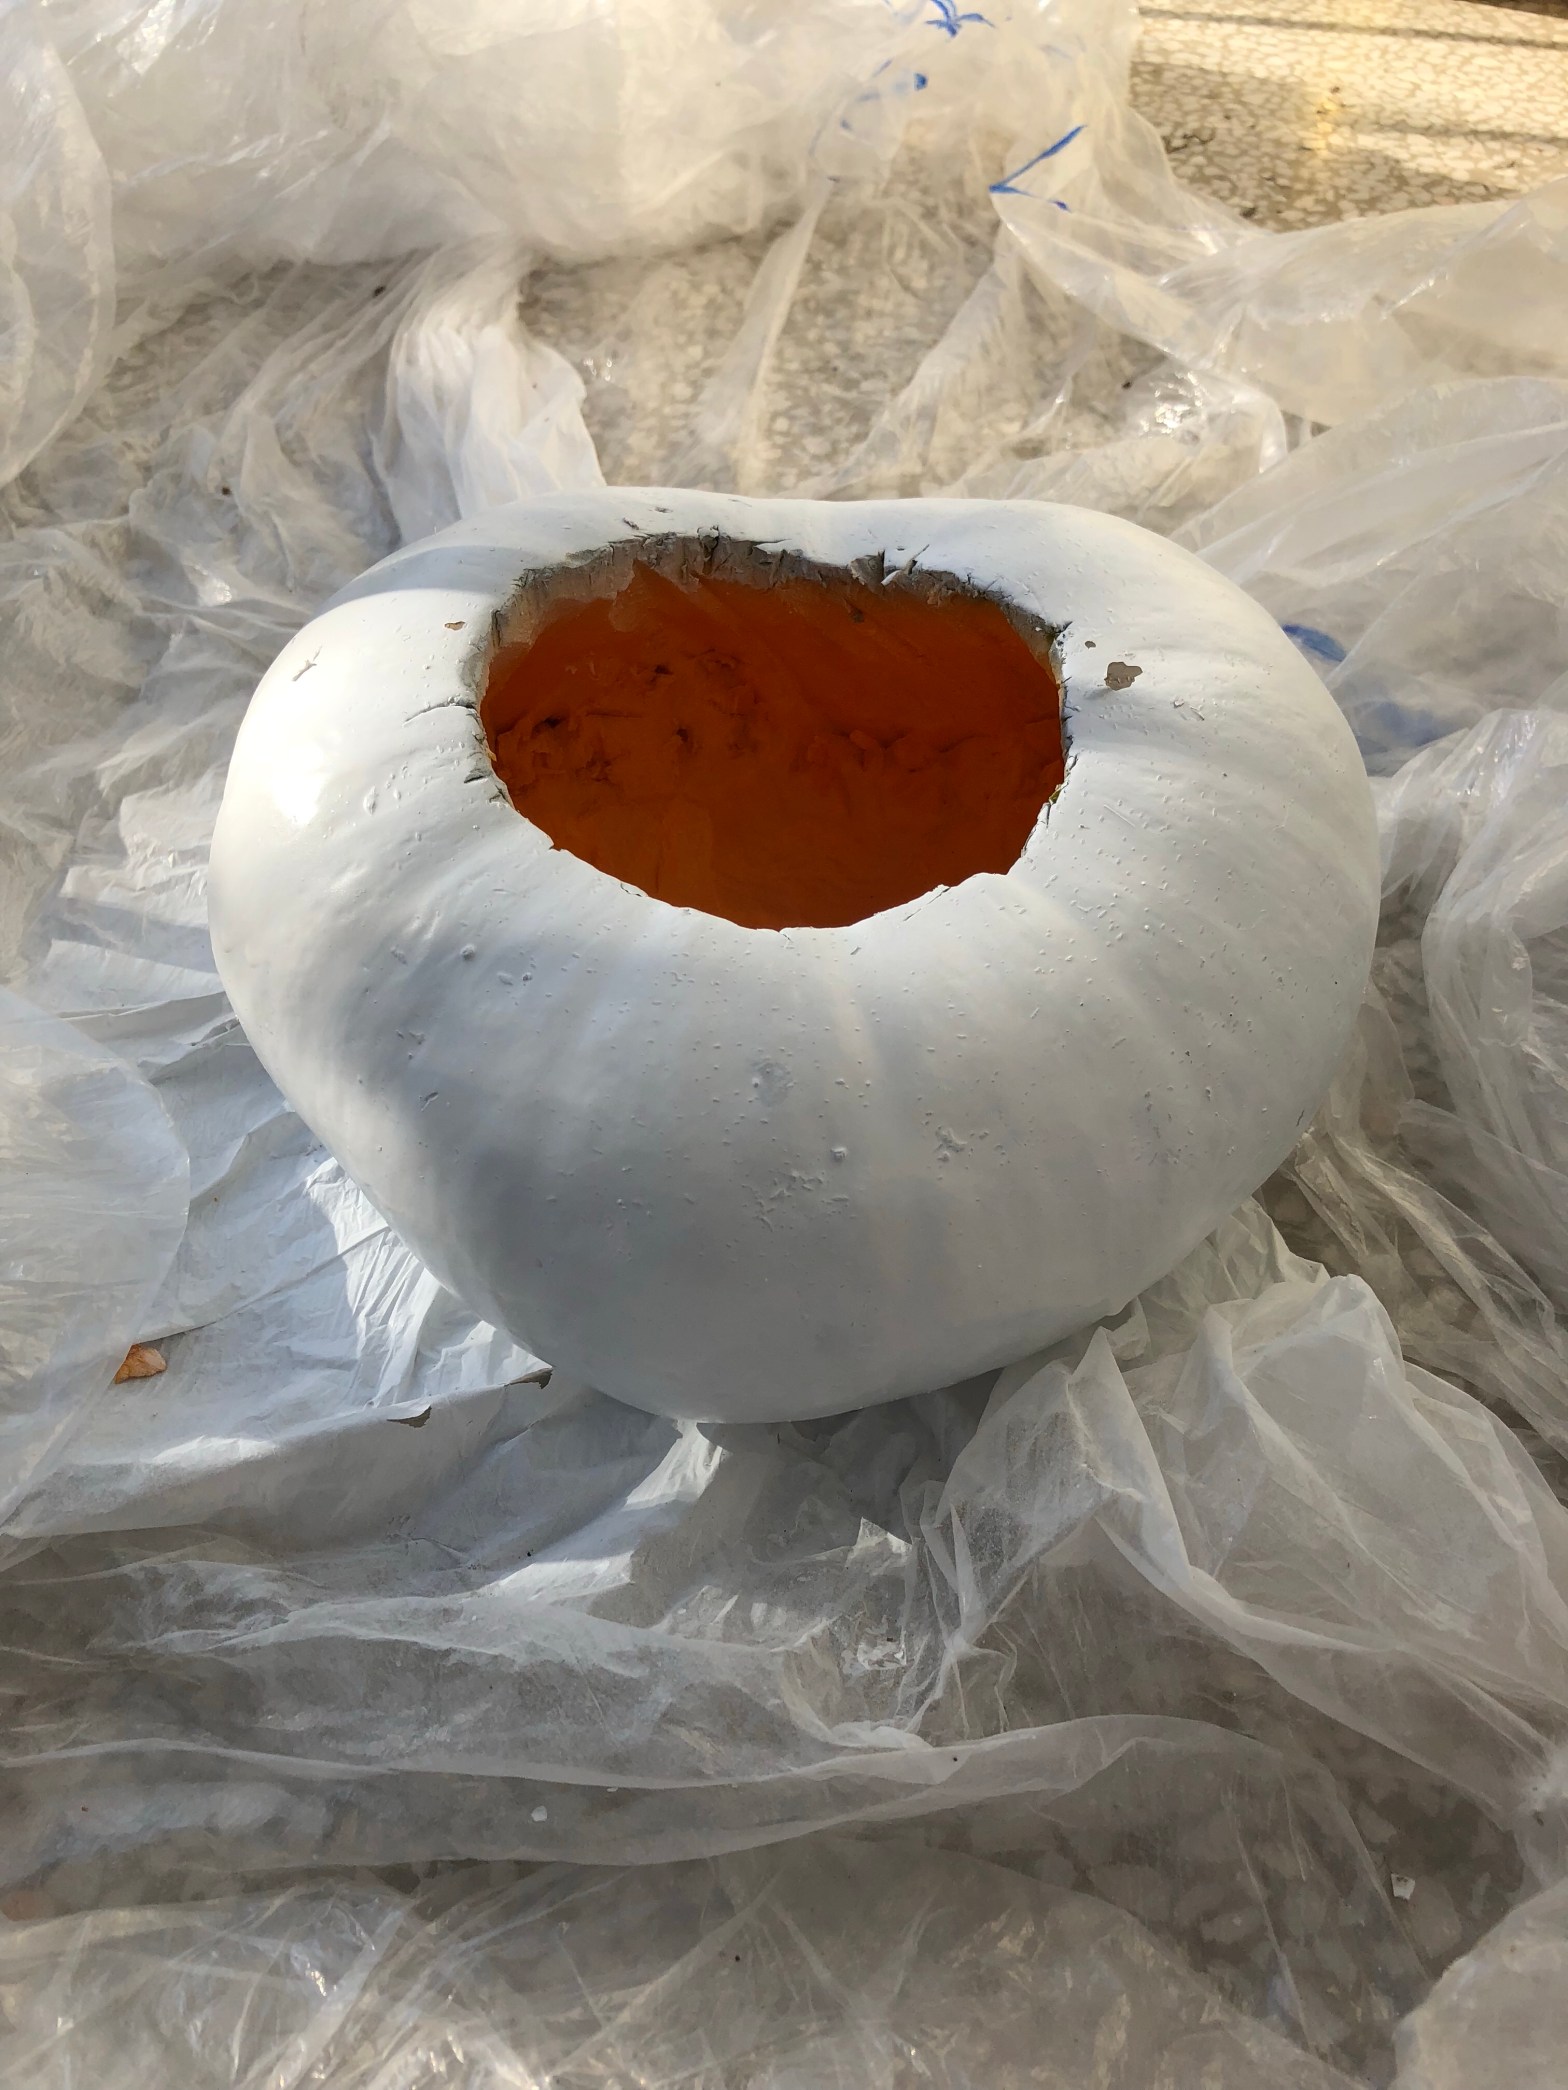
It is pumpkin season my friends! Pumpkin soups, pies and cakes are lined up in my kitchen menu and I have stocked up a large amount of pumpkins in my garage. I love pumpkin and the only thing that makes me happy in fall, beside the fall colours, is the pumpkin soup.
Looking at my pumpkin “arsenal” that had flooded my garage, I wanted to make a succulent centrepiece that everyone is making these days. I used my garden succulents and some silver foliage.
The centrepiece turned out quite pretty and I am loving it.
To make this centrepiece I used a flat pumpkin and started by cutting a generous top opening and scooped out the seeds, then I spray painted it in white.
After the paint dried out, I inserted a small plastic container filled with soil and started arranging the suculents and the foliage.
This was all what I did to get this beautiful decorating piece. I continue to apply spray mist every second day to the succulents and foliage some of which are glued to the pumpkin.
To make the centrepiece last longer you may want to leave it outside on a colder weather and bring it inside when you want to decorate with it. This way you can extend the life of the pumpkin, as it starts deteriorating fast when it is in a warm place.
If you make one, please share it, I would love to see how your’s turned out.
Thank you for checking this blog.
The third week of One Room Challenge came faster than anticipated.
If you are new here, thanks so much for checking out my Studio Office Space Design On a Budget project. You can check my first and second post related to this project if you’d like to see or get reminded what I started with when I entered the One Room Challenge event and the progress thereafter.
The beginning of the past week was quite labour intense for me as I was rushing to get the painting of the room done, and I am releived that this task is over.
I had to get it done fast as I had scheduled the floor refinishing company to come and do the floors. The old floors were in a terrible state and I was debating whether to refinish them or install the new flooring. At the end, driven by the nostalgia of this old building, I decided to keep the original flooring and refinish them.
The floors look so much better now!
The floor refinishing project was completed two days ago and I am proceeding with the prep work for painting the window.
Since the floors are refinished I was able to bring my office desk in and check how it will look into this new space, which is much smaller than my previous spacious studio premises.
I think that the desk will fit just fine. Now I need to get back to work and hopefuly by the end of the week to start with the stenciling job.
Just a small recap about the ORC event:
The one Room challenge is a 6 week room makeover challenge for designers and bloggers nationwide. There are 2 sides to this coin. One side being the 20 selected designers competing for the win. On the other side of that same coin, there are guest participants like myself. At the end of the 6 weeks, the editors of Better Homes & Gardens will select 2 guest participants to be FEATURED DESIGNERS in the 2019 Spring ORC challenge!
Vera e gjate, me plote gjelbrim dhe temperatura te larta ngadale po iken dhe se shpejti temperaturat do te bien, gjelbrimi do te venitet dhe natyra do te filloj te mer pamje krejtesisht tjeter.
Mirepo, edhe kjo pamja e re te cilen e mer natyra ne stinen e vjeshtes eshte po aq e bukur sa edhe pamja verore e natyres, por me nuanca krejtesisht tjera dhe me temperatura me te ulta.
Posa te fillojne keto ndryshime te pejsazhit ne natyre si dhe me ramjet e para te temperaturave, eshte koha te fillojme te mendojme se si te pershtatemi me keto ndryshime ne natyre dhe si t’i inkorporojme keto ndryshime stinore ne ambientet tona te brendshme apo te jashtme, ashtu qe t’a perjetojme sa me bukur kete stine.
Shumica e njerzve deshirojne te dekorojne per kete stine, por qe ne fillim ndeshen me ate pikepytjen e madhe se nga t’ja fillojne dhe cfare te perdorin per dekor vjeshtor.
Cfare te dekorojme dhe ku te fillojme?
Munde te fillojme me dekorimin siper oxhakut, ose perreth tije nese e kemi nje te tille:
Pastaje munde te bejme nje kompozicion dekorativ vjeshtor siper tavolines se kafes, e te gjithe e kemi nje te tille.
Nese e kemi ndonje komode ose tavoline konzolle (tavoline e ngushte dhe e gjate e mbeshtetur per mur) edhe aty munde te krijojme nje vinjet (aranzhim/kompozicion me gjesende dekorative). Edhe siper tavolines se ngrenjes gjithashtu munde te krijojme vinjet te bukur vjeshtore.
Hapsire tjeter ku preferohet dekori vjeshtor eshte edhe hapsira tek hyrja ne shtepi si dhe dera e hyrjes e cila munde te dekorohet me ndonje kurore te punuar nga gjethet e thata ose elemente tjera natyrore qe jane karakteristike e stines se vjeshtes.Ne hapsiren tek dera e hryjes munde te vendosim vazo me lule sezonale, kunguj te formave e madhesive te ndryshme, lanterna me qirinje etj.
Cfare te perdorim per dekor vjeshtor?
Elementet natyrore te stines jane ato me adekuatet per nje dekor vjeshtor.
Vjeshta vjen me ngjyra shume te bukura, prandaj te fillojme me ato cfare na sjelle ajo vet. Gjethet me ngjyra e bukura, pastaje dege te drunjeve te formave dhe ngjyrave interesante jane nje prej elementeve dekorative te cilat i gjejme coft ne oborret tona ose gjetiu.
I aranzhojme ato bukur neper vazo te qelqit ose vazo tjera dhe keshtu ne menyre instante e kemi nje dekor vjeshtor te dhuruar nga natyra pa pagese.
Pastaje me gjethe dhe lule te thata dhe degeza te drunjeve, copeza te drunjeve munde krijojme vete gjesende dekorative qe do t’i perdorim per krijimin e vinjeteve te ndryshme qofte siper oxhakut, tavolines se kafes, siper komodes etj.
Poashtu kungujt e formave, madhesive dhe ngjyrave te ndryshme jane nje prej elementeve dekorative shume te perdorura per stinen e vjeshtes. Lulet si krizantemat e kopshtit (Chrysanthemum) ose mums jane lule karkteristike te kesaj stine dhe keto jane shume te pershtatshme, ne kombinim me kungujt, per dekorin e hapsires perreth hyrjes se shtepise, ndonje kend ne kopsht, pastaj ne dekorin e ballkoneve, terrasave etj.
Ne haspirat ku qendroni munde te sjellni jastek dekorativ dhe mbulesa te kendshme e te buta. I gjeni ato ne nuanca te portokallit, ngjyre, arit, nuanca te kaftes per nje dekor me klasik tradicional, ose ngjyres bezh, kafet dhe te zeze per nje dekor me modern.
Me kellef te jastekve te materialeve me te trasha dhe mbulesave me theke munde te sjellim edhe teksture e cila eshte shume me rendesi per kete stine sepse e krijon ate ndjendjen e ambient te ngrohte ne ditet dhe netet e fresketa te vjeshtes. Per te kursyer, ne mund te qepim ose te blejme kellefe te jastekve te ngjyrave sezonale dhe ti vendosim ne jasteket dekorative egzistues.
Qirinjet aromatik, e sidomos ata me arome kanelle, qokollade, kafeje, etj, jane gjithashtu elemente qe duhet patjeter t’i inkorporojme ne dekorin vjeshtor. Drita e bute dhe aroma e kendshme e tyre krijojne atmosfere te ngrohte dhe japin ndjenje relaksuese.
Shumicen e elementeve dekorative per kete stine munde ti gjejme ne shtepi ose t’i krijojme vet me pak shpenzime, keshtu qe edhe me keto keshilla bazike dhe praktike te shtjelluara me larte besoj se secili, shpejte dhe lehte, munde te krijoj vet nje dekor vjeshtor brenda dhe jashte shtepise se tije/te saje.
Nese e krijoni nje dekor vjeshtor ose veq me e keni krijuar nje te tille ju ftoj qe ta ndani me ne!
Ju falemiderit qe vizituat kete faqe.
P.S. Teksti i ketije posti se bashku me fotot jane e drejte autoriale e BESA GM Ineteriors.
Besa
The second week is already here and for me as well as, I believe, for all other ORC participants the time is just flying. If you are new here, thanks so much for checking out my Studio Office Space Design On a Budget project. You can check out my first post related to this project if you’d like to see or get reminded what I started with when I entered the One Room Challenge event.
As far as myself is concerned I can say that, this week was an intense working week around here and there were a lot of major tasks that I had to undertake on the first week of this challenge. First I cleared up the room from all the stuff that was in it, took off the sofa slipcovers and arranged that the old sofa and loveseat are taken to the junk yard. Arranging these tasks, due to some complications, took me almost two days.
After the room was freed from the bulky stuff, I started with prepping the walls so I could apply the paint on the walls and the ceiling. I did the filling of the cracks and nail holes on the walls and applied the primer. I also managed to start with the first coat of paint.
After I am done with the paint, there comes the hard job and I may say an intimidating task of stencilling the walls with a sharpie!
I was inspired by the talented Julia from cuckoo4design who created the most chic little square stencil which she used on her powder room walls. She turned a small powder room into a such lovely space in her home. Thank you Julia for creating this stencil, I am in love with the design. (IMAGE VIA CUCKOO4DESIGN)
To create this stencil she was inspired by this bathroom designed by Greg Natale. Everyone may agree that this is absolutely a stunner bath!
Unfortunately I couldn’t order the stencil, so I had to make my own.
I figured out how this stencil works for the repeat, and then I marked the small squares in a double A4 sheet. I enlarged the double A4 sheet twice using a photocopying machine, and laid the sheets with the design underneath the clear vinyl sheet.
Using the exacto knife, and following the design underneath the vinyl sheet, I started cutting the small squares. I ended up with not so perfect stencil, but I am still determined to go ahead. I ask everyone to keep the finger crossed so I will not mees up the accent walls with this DIY stencil.
So this is all I have to share for this week. I am back to painting the room and hopefully will be ready by Saturday when I expect the floor refinishing guy to come and do the floors which are begging for refinish.
I am so happy that I finally made a commitment to take part as a guest participant in the fall edition 2018 of One Room Challenge event. For those out there who wonder what the One Room Challenge (or the ORC) is, it is an interior design/decor event that happens twice a year and is put together by the incredible Linda from Call It Home blog. The event starts with a group of talented designers selected to transform a room in short six weeks. The rest of us get to be guest participants that start a day later.
This is the second time that I am taking part as a guest participant and I am even more nervous than the first time. The first year I took part was for the spring ORC edition 2016, and I did a makeover of the room shown in these pictures.
For this year I am redoing again this room as shown, and which will be used as my Interior Studio Office space.
Since my business is in baby steps at present, I have allocated a minimal budget to complete this space in 6 weeks. Therefore, there will be a lot of DIY’s involved and most of the job will be done by myself, so I am just crossing my fingers that everything will go smooth, and I will be able to deliver something worth of showing in six weeks time.
So my friends, lets the fun begin, and I happily invite you to follow my journey through these coming weeks as I will try to make BESA GM’s Interior Studio space to a cool and chic interior all on a budget, and follow as well the challenges I may face during this journey.
Below, a few more photos of the current look of the room wich is about to get a completely new vibe in six weeks.
Almost thirty years ago, when my husband and I were renovating and decorating our first condo, we pretty much drained our budget with the first two purchases: kitchen cabinets and living room furniture. In fact, not only we drained our entire budget, but we had to pay for the purchases in instalments for one long year. Our budget was drained and our condo looked pretty much empty without any decorative items. However, I wasn’t prepared to live in an empty looking space so I started a series of DIY projects to make our condo a functional, well decorated and happy living space.
The first DIY in our first condo was creating a much needed shelf in our bathroom to put our toiletries, towels, toilet paper etc. I DIY-ed a hanging shelf then from a leftover long board from the kitchen install using a long piece of rope that we already had. THe created shelf was a completely free item which turned so stylish and chic, and for us was a life saver as it gathered all necessary bath stuff.
These days also, I did a few hanging shelves which I needed for a project, and I want to share them with you the process so you may get inspired to make them too. It is an easy and supper fast project that can be finished in less than an hour.
For this project you need a piece of board 45 cm long 15 cm wide (any size will work), cord, a ring, measuring tape to mark the openings for holes, drill for the holes, scissors to cut the cord.
First you mark the holes and drill through the marks.
To hang your shelf, cut two pieces of cord to your desired length, remembering to leave room for the knotted ends. I cut 2 pieces of 1 metre cord.
Fold the two pieces in half, and place the folded end underneath the metal ring.
Pull the folded end over the metal ring, then pull the rest of the cord up and through the loop.
Separate two of the strands. Pull each strand through one of the drill holes. Repeat on the other side.
Adjust the length of the cord to make your shelves hang as high or low as you want. Then, tie knots at the end of each piece of cord. Trim off the excess cord if needed, and hang your shelf.
The result is a simple design that makes a big impact in your space, and the most important thing is that you did it yourself!
If you make one please share it with me. I would love to see how your’s turned out.
Thank you for visiting this blog!
Raftet Varese – Nje projekt “Beje Vet” i shpejte dhe i lehte
Gati tridhjet vite me pare, kur une dhe bashkeshorti im ishim duke e renovuar banesen tone te pare, e kishim hargjuar pothuajse tere fondin e parave te nevojshme per renovim dhe mobilim pas blerjes se elementeve te kuzhines dhe kolltuqeve te dhomes se dites. Jo vetem qe i hargjuam te gjitha parat, por pjesen me te madhe te blerjeve u dasht qe t’a paguajm me keste per nje vit. Pasi qe pothuajse e kishim shterur bugjetin tone per ate vit, mundesit per te blere gjera dekorative per zbukurimin e baneses ishin te vogla. Megjithate, une nuk isha e pergatitur te jetoj ne nje vend te padekoruar bukur i cili edhepse i mobiluar dukej si i zbrazet dhe pa jete; keshtu qe fillova me nje vazhde te projekteve te tipit Beje Vet (DIY) ne menyre qe t’i beja hapsirat e baneses sone me funkcionale dhe te dekoruara bukur.
Projekti i pare i tipit Beje Vet ne banesen tone ishte punimi i nje rafti vares ne banjon tone i cili ishte me se i nevojshem per vendosjen e toileteris, peshkirave, letres toalet etj. Une e punova atehere nje rafte te tille vares duke e perdorur nje derrase e cila kishte tepruar nga instalimi i kuzhines, si dhe nga nje cope litari te cilin veqme e kishim. Rafti te cilin e krijova ishte nje gjesend qe nuk kushtoi asnje cent ( dinar ne ate kohe) dhe i cili rezultoi te jet shume i bukur dhe funkcional pasi qe ne te i grumbulluam te gjitha gjesented e nevojshme te toaletit.
Keto dite, duke e involvu metoden Beje Vet, i punova disa rafte te tilla varese per nje projekt ne te cilin jam duke punuar dhe do t’a ndaj me ju, lexuesit e ketije bllogu, procesin e punes se krijimit te ketyre rafteve duke shpresuar qe kjo te ju inpsiroj qe edhe ju VET ta beni nje te tille. Ishte nje projekt shume i lehte dhe i shpejte i cili u kompletua per me pak se nje ore.
Materiali i nevojshem per kete projekt eshte nje cope derase me gjatesi 45 cm dhe gjeresi 15 cm (ose cfardo gjatesie ose gjeresie qe ju konvenon), nje unaze cfardo madhesije, litar ose cfardo shiriti tjeter sipas deshires, metri per caktimin e vrimave, drilli per hapjen e vrimave, gersheret per keputjen e litarit.
Se pari i beni me shenje poziten ku do te hapen vrimat (ne kater skajet anesore te derrases) dhe me drill elektrik i hapni vrimat. Madhesija e vrimes duhet te korespondoj me trashesine e litarit.
Per t’a krijuar pjesen varese te raftit, i preni dy fije te litarit ne gjatesi te cilen e deshironi, duke pase parasyshe qe te shtoni edhe pake gjatesi per nyjet qe do te lidhen perfundi derrases. Per kete projekt une i keputa dy fije te 1 meter gjatesi.
Te dy fijet i beni bashk dhe i paloni ne mes duke e krijuar keshtu nje vegez siper se ciles e vendosni unazen.
E terhiqni pakez vegezen e krijuar nga unaza dhe neper te i kaloni fijet e litarit.
I terhiqni fijet fort ne drejtim te unazes ne menyre qe ta beni nje nyje
I ndani nga dy fije ne secilen ane. E kaloni secilen fije pertej seciles vrime ne te dy anet.
Bejeni nivelizimin e fijeve te litarit ne menyre qe raftet t’i varni ne lartesine e deshiruar, dhe pastaje secilen fije te kaluar neper vrime e lidhni ne nyje. I preni pjeset e teperta te fijeve nese ka nevoje, dhe e beni varjen e raftit.
Rezultati eshte: nje dizajn i thjeshte qe bene impakt te madh ne hapsiren tuaj, dhe me e rendesishmja Ju e keni bere VET.
Nese e Beni Vet nje te tille ju lutem me thuani se si doli i juaji.
Ne Miremengjesi Kosove – RTK live, ku per shiquesit e ketije programi bera prezentiminnse si mund t’a punojme vet nje raft vares!
Every functional living room has or needs a coffee table. It is a necessary furnishing item in a room where we place our drinks, remotes, magazines or our books while reading etc. Since in most households the coffee table might be also a focal point of the room, it is a good idea to dress it up nicely so, beside its functionality, the well decorated table will bring some style and personality into a room.
What to consider when styling a coffee table?
There are no strict rules as how to decorate a coffee table, as this always depends from the life style, creativity of a person, and other personal preferences for the coffee table use; however, for all those who aspire to have a well curated coffee table look it is good to know where to start to achieve that look.
Decorating a coffee table is really simple, and you don’t need to go shopping for decorative items for coffee table decor. In most of the cases you can find those around the house.
Few things that are a good idea on a coffee table and which you may already have:
Books
Books, specially those that inspire you or are a good conversation starters are always a god idea for a table decor. Stack them together so to create height and create visual interest. Way to stack the books together for a great look is to go with the largest one at the bottom and continue with the smaller at the top; this way we create height and add visual interest. While stacking them it is always good to look how those will look from the sides.
Tray
Tray is another classic item when it comes to table decorating.
A tray serves both a practical and stylish purpose by showcasing your favorite small finds while also making them easily removable should you need to clear the surface for entertaining. A tray is also useful for giving structure and symmetry to a freeform table. Candles
Candles are another classic decorative item in coffee table decor. They create a warm ambiance, especially some good scented ones, so it is a good idea to incorporate them in our table decor. They come on various forms and styles making it possible to add a proportion, texture, height and style to a coffee table. When using scented candles I recommend not to use two or more different scented candles at a time as sometimes different scents mixed together may create a bad smell, thus ruining the enjoyment. Flowers and Plants
It is non disputable fact that nobody can go wrong by using fresh cut flowers in table decor; and in my opinion, flowers should be a must in any coffee table decor. Flowers and plants add natural texture and color, and even the dullest coffee table may look pretty and styled by using a bunch of fresh cut flowers or a nice planted one.
Accessorise and Keep It Personal
To create a stylish and meaningful coffee table decor, beside adding accessories that are also functional, consider adding an item which is personal to you as a homeowner. Personal items, such as small items for your memorable travels or vacations, an inherited item of a sentimental value etc. are a good conversation starters and make your coffee table decor look unique and personalised.
So if you if you take into consideration the above tips such us using decorative items which vary on height ( created by a stack of books, flower vases , candles), using texture ( flowers and items with different forms and finishes) and by adding something personal, you are, without doubt, on a good track to create a great coffee table decor.
Update: My appearance at RTK Live – Morning Show chatting about this topic
Thank you for visiting this site!
Besa
Si t’a dekorojme tavolinen e kafes
Secila dhome funkcionale e dites e ka nje tavoline te kafes ose, nese nuk e ka, i nevojtet nje e tille. Eshte nje vend i domosdoshem ku mund ti vendosim gotat e pijeve gjat konsumimit te tyre, pastaje librat ose revistat e ndryshme si dhe teledirigjuesin e tv’s etj., dhe kjo ka te beje me ate pjesen funkcionale e tavolines se kafes. Pasi tek shumica kjo tavoline munde te jet edhe pjesa fokale ne dhome, atehere do te ishte ide e mire qe ate t’a dekorojme bukur, ne menyre qe perpos funkcionalitetit, dekori i saje do te sjelle stil dhe personalitet ne ate hapsire.
Cfare te konisderojme me rastin e dekorimit te tavolines se kafes?
Nuk egzistojne regulla specifike se si te behet dekori i nje tavoline te kafes, sepse kjo gjithehere varet nga stili i jeteses se personit, kreativitetit, preferencave personale etj.; megjithate, per te gjith ata te cilet deshirojne ta ken nje pamje te kuruar te tavolines se tyre te kafes, atehere eshte mire te dijne se nga t’ja fillojne per t’a arijtur nje dekor te bukur qe ata ose ato e aspirojne.
Edhepse per disa dekori i tavolines eshte art ne vete, per te gith ata te cilet deshirojne qe ta ken nje dekor jo edhe aq extravagant, dekorimi i nje tavolineje te kafes eshte shume i lehte; dhe, shumica prej nesh nuk kan nevoje qe domosdoshmerisht te blejne gjesende dekori per kete qellim. Ne shumicen e rasteve ato gjesende dekorative do ti gjejne ne shtepi.
Disa gjesende te cilat do te ishte ide e mire qe ti perdorim ne dekorin e tavolines se kafes e te cilat mund ti keni ne shtepi:
Librat
Librat, e posaqerisht ata qe na inspirojne ose jane inicues te mire te bisedes, jane gjithehere ide e mire qe te jene pjese perberse e dekorit ne tavolinen e kafes. Dhe libra kemi qe te gjithe, edhe pse ndoshta jo ato nder me luksozet te botuar enkas per t’i vendos siper tavolines se kafes. Lbrat e perzgjedhur I radhisim njerin siper tjetrit ne menyre horizontale duke filluar nga me i madhi i vendosur ne pjesen e poshtme, dhe duke vazhduar me te vegjlit siper; ne kete menyre ne krijojme lartesi dhe interesim visual. Gjate radhitjes se tyre eshte mire te shiqojme se si po perputhen ngjyrat e kopertinave dhe si duket radhitja nga anet tjera.
Tabaka
Tabaka eshte nje element poashtu klasik dekorativ per sa i perket dekorit te tavolines se kafes. Ajo e ka edhe ate elementin funkcional e edhe dekorues ne tavolinen e kafes, pasi qe ne te mund te vendosim gjesende te ndryshme dekoruese e qe krijojne simetri dhe strukture ne tavoline; si dhe ne anen tjeter e bene te mundur qe ti largojme shpejte te gjitha dekoret ne tavoline duke e menjanuar tabaken ne rastet kur na nevojitet tavolina per shfrytezim (p. sh. lojra me miq dhe familje si shahu, letrat etj.)
Qirinjet
Qirinjet jane nje tjeter element dekorues shume te perdorur siper tavolines se kafes. Perdorimi i tyre krijon nje ambient te ngrohte, e sidomos perdorimi i qirinjeve aromatik, andaje eshte mire qe t’i inkorporojme qirinjet ne dekorin e tavolines. Ata i gjejme ne forma dhe madhesi te ndryshme duke e bere keshtu te mundshme qe me perdorimin e tyre te shtojme proporcion, stil, lartesi dhe teksture ne dekorin e tavolines. Nese perdorim qirinje aromatik, atehere rekomandoj qe te kemi kujdes dhe mos ti ndezim ne te njejten kohe qirinjet me aroma te ndryshme, pasi qe aromat e tyre mund te mos lidhen mire me njera tjetren dhe si pasoje te kemi nje ere te pakendshme qe pastaje e prishe ate ndjenjen e kenaqesis se perdorimit te tyre.
Lulet e fresketa dhe ato ne saksi
Eshte fakt i pamohueshem se askush nuk mund te gaboj me inkorporimin e luleve ne dekorin e tavolines se kafes dhe, sipas mendimit tim, perorimimi i luleve te fresketa do duhej te ishte imperativ ne dekorin e tavolines. Lulet e fresketa dhe ato ne saksi shtojne teksture dhe ngjyre, ashtu qe edhe tavolina me e thjeshte dhe mbase edhe me e vjetruara do te duket e bukur, e fresket dhe me stil nese ne te eshte e vendosure nje buqete lulesh ose ndonje lule ne saksi.
Akcesorizimi dhe personalizimi
Per nje dekor me shume stil rekomandoj te behet akcesorizimi me gjesende dekoruese te cilat perpos qe munde t’a ken nje funkcion ne tavoline, ato kan edhe nje sentiment per ju. Keto munde te jen gjesende interesante te sjella nga ndonje udhetim, ndonje gjesend i trasheguar nga familja, ose gjera te tilla personale te cilat munde the jen gjithashtu edhe inicues te bisedes, dhe per me teper e bejne qe dekori i tavolines s’uaj te kafes te duket me unik dhe i personalizuar.
Andaj, nese i merni parasysh keshillat e siperme s’i; perdorimi i gjesendeve dekoruese te lartesive te ndryshme (qe munde te arrihet me perdorimin e librave te radhitur njeri siper tjetrit, vazo te ndryshme, qirinjeve me lartesi te ndryshme); perdorimi i teksturave (lulet e fresketa dhe ato ne saksi, si dhe gjesendet me forma dhe finishe te ndryshme), si dhe duke e inkorporuar ndonje gjesend personal ne ate dekor, padyshim se ju jeni ne rruge te mire per te krijuar nje dekor mbreselenes te tavolines s’uaj te kafes.
Ju faleminderit qe e vizituat kete faqe!
Besa
image via pinterest
The summer weather started fading and leaves will soon change color, so it’s time to gear up for cold and cozy fall and winter weather. For many people, this means picking up a pumpkin spice latte, starting a fire, and, if you’re lucky, curling up under a blanket with a good book.
Is there anything better than reading a good book while you are tilted in your favorite comfortable chair, away from reality and everyday stressful life in the fantastic adventures of literary stories and worlds? I think there isn’t, so why not setting up a reading nook for that matter!
Creating a reading nook in your home will prove to be one of the most rewarding interior decisions. It will always serve as a cozy getaway within your home, an invitation to wind down and relax after a stressful day and a motivation to get started on that big pile of books that’s been sitting on your coffee table!
Tipps for Creating a Reading Corner
Location
There are a few great options for creating a reading corner. Some people like to choose a space under the stairs to convert, and others like to choose a window seat that gets tons of natural light. Even a closet can be converted into a reading corner. Make sure that your planned area will blend well with the aesthetic of your home.
Pick the Right Spot for a Reading Corner
Reading corners take up a very little footage space. The right spot can be an unused corner in your bedroom, living room or even extra space in a hallway. Before you pick a spot for your reading nook, consider how you feel in the space: Can you make it cozy and comfortable? Will it be quiet? And if you’re cramped and in a space with a lot of interruptions, it will be difficult to get comfortable and focus.
Seating
The key word for your reading corner is comfort. Create comfortable seating area that allows you to relax and to get lost in the pages of a book. Try to keep the style of the chair similar to the surrounding furnishings, but be open to shape and color and consider reupholstering a favorite chair. A chaise lounge will allow you to stretch out, while a cozy chair with foot rest or recliner may work with the room better.
Lighting
While a reading nook with a lot of natural light works best, a good reading lamp or wall sconce can create the cozy feel your space needs. So try a light with a few settings so you can adjust the lighting depending on the time of day and your needs.
Table Space
A small refinished table placed against a reading chair is a must for a reading corner. It will allow you to keep a cup of hot cocoa or tea nearby, or why not a glass of wine also. You can also use the table for a small plant or a vase of flowers. And every object placed in your reading nook should create a relaxing environment.
Reading is a great way to relax, but a reading nook, book nook or reading corner is also a way to add a little comfort and charm to your home.
Here are some beautiful ideas of reading nooks designs hopefully to motivate you to create your own!
Update: My appearance live on RTK Morning Show talking about reading corners in Interior Design
Thank you for visiting this site!
Besa GM
images via pinterest
Reading corners for litle ones
Kendi i Leximit – Si t’a krijojme ne te tille
Veres po i afrohet fundi, e se shpejti gjethet fillojne te ndryshojne ngjyren. Vrantesirat, shiu dhe te ftohtit do te zevendesojne diellin dhe freskine e mbremjeve verore, andaje eshte kohe te fillojme te mendojme te pergaditemi qe sa me kendshem t’a kalojme kohen e ftofte qe sjell vjeshta dhe dimri!
Per shume kend kenaqesia dimerore munde te jet ndezja e zjarit ne oxhak, ose thjesht strukja nen batanije te bute e te ngroht, ne nje vend komod me nje cokollades te nxehte, caj ose kafe ne njeren dore dhe nje liber te mire ne doren tjeter.
A ka kenaqesi me te mire se te jesh duke e lexuar nje liber te mire perderisa je e ulur ne nje ulese komode qofte ai kolltuk, divan ose shtrat ditor qe te ben te largohesh nga realiteti dhe stresi ditor dhe te futesh ne boten, storjet ose aventurat fantastike qe t’i ofron libri? Une mendoj qe s’ka gje me te mire se kjo, andaj pse mos ta krijojme nje kend leximi!
Krijimi i nje kendi te leximit ne shtepi ose banese do te jet nje preje vendimeve me te mira ne kuader te aredimit e enterierit. Ky kend gjithmone do te sherbej si nje ikje e kendshme nga perditshmerija, perbrenda shtepise s’uaj, nje ftese qe te shkosh aty dhe te ralaksohesh pas nje dite te lodhshme dhe me stres, si dhe nji motivim per te filluar leximin e librave te grumbulluara per lexim dhe studijim.
Cfare te kemi parasysh me rastin e krijimit te kendit te leximit!
Lokacioni
Ka opcione te shumta per krijimin e kendit te leximit. Disa e perzgjedhin qe ky kend te jet afer dritares dhe ta krijojne nje ulese aty, disa e krijojne nje kend te tille perfundi shkalleve, te tjeret kete kend e krijojne ne dhome te dites apo te fjetejes, e disa edhe ne koridor ku ka hapsire te mjaftushme; pra mundesite jane te pafund!
Zgjedhja e vendit adekuat te kendit te leximit
Kendi i leximit kerkon shume pak hapsire dhe vend adekuat mund te jet ndonje kende i paperdorur ne dhomen e gjumit, dhomen e dites, ndonje extra hapsire ne koridor etj. Para se te perzgjedhni kthinen per kendin e leximit konsideroni se si do te ndiheni ne ate vend, dhe se a do te mund te beni ate vend te kendshem dhe te rehatshem? A do te jete qetesi ne ate vend? A do te kete qarkullim te shpesht ne ate hapsire, se poqese do te nderpreheni shpesh ne lexim, atehere do te jet e veshtire qe te fokusoheni dhe te ndiheni komod.
Vendi ku ulemi
Gjeja kyqe ne kendin e leximit eshte eshte komoditeti. Eshte me rendesi qe te krijojme nje vend te rehatshem te uljes i cili do te na ndihmoj qe te relaksohemi dhe humbemi ne faqet e librit. Kjo mund te jet nje karrige e rehatshme e leximit, ndonje kolltuk i rehatshme ndonje otoman i zgjatur i vendosur ne ndonje kend te pershtatshem per lexim etj. Me rendesi eshte, gjithashtu qe stili dhe dizajni i kariges se kendit te leximit te pershtated me mobiljet egzistuese. Otomoani i zgjatur do te na mundesoj qe t’i zgjasim kembet dhe te marim pozite komode gjate leximit, por edhe ndonji karige ose kolltuk me nje jastek dyshemeje ku mund ti vendosim shputat gjate leximit do te ket efekt te njejt relaksues.
Ndriqimi
Perderisa nje kend leximi me ndriqim natyral do te ishte ideal, nje llambe leximi ose llambat ne mure do te mundesojne ndriqim adekuat si dhe do te krijojne nje ndjenje te kendshme qe i nevojetet asaj hapsireje. Pra, ne mungese te drites natyrale ne kendin e leximit munde te instalohet nje llamb (mundesisht spot) me potenciometer ku do te kontrollohet sasia e nevojshme e drites gjate leximit.
Tavolina e vogel
Nje tavoline e vogel sherbyese e vendosur pran karriges ose kolltukut te leximit eshte e domosdoshme ne kendin e leximit. Kjo do te na mundesoi qe aty ta vendosim librin gjate pauzave te leximit si dhe ta mbajme aty pijen tone te preferuar, qoft ai nje caj, cokollade e nxehte ose pse jo edhe nje gote vere, gjithashtu. Aty munde te vendoset edhe ndonje vazo me lule te fresketa ose ndonje ndonje lule ne saksi. Cdo objekt i vendosur ne kendin e leximit duhet te krijoj nje ambient relaksues dhe te kendshem.
Leximi eshte nje menyre e persosur per tu relaksuar, por ne te njejten kohe kendi i leximit i dizajnuar mire eshte poashtu nje menyre e mire qe te shtojme komoditet dhe sharm ne ambientet tona.
Ne fotot me larte i gjeni disa ide shume te bukura te disajnit te kendit te leximit, ide te cilat, shpresoj, do te ju motivojne qe te krijoni nje per veten tuaj.
Ne videon me poshte e gjeni paraqitjen time ne RTK Live _ Miremengjesi Kosove ku diskutuam per kete teme.
If you think that a granny square crochet pieces are outdated and that the idea of incorporating them in your home decor projects can make your space look so granny, than think again!
These fresh looking crochet pillows that were used in this balcony makeover tell us just that!
This “granny” balcony situated in an old city building from a communist era with it’s odd shape (supper long and extremely narrow) was a good candidate for a makeover using these crochet pillows from my Summer Pillow Collection 2018!
Using some used outdoor furniture, some inexpensive decorative items and by incorporating these crisp crochet pillows, I turned this outdate looking balcony into a cool place to chill during hot summer days. B
The hand made front crochet pillow pieces are made of 100% cotton yarn and attached to pre washed 100% organic white cotton fabric and they were part of my pillow collection – Summer 2018.
These old fashioned pillows made this balkony look fresh and modern despite its odd shape and “age”; so, never underestimate the power of granny chrochet squares. To order pieces from this collection write us at besagmblog@gmail.com! We love to make your spaces looking great for less!